React Native 组件样式 style
我们知道,在 HTML 中可以通过标签的 style 属性定义样式,也可以通过 `` 标签来定义样式。
React Native 也可以通过组件的 style 属性来定义组件的布局和外观,也可以通过 StyleSheet 来定义组件的外观。
React Native 的基础语言是 JavaScript,React Native style 的属性是 JavaScript 的一个键值对 对象。键是 CSS 的样式名,值是 CSS 的值。
理解这一点很重要,不然你不能理解为什么
style有两个大括号{{}}
-
通过 style 属性定义视图组件 `` 的背景色
<View style = {{backgroundColor:'#333333'}}></View> -
通过
StyleSheet组件定义视图组件 `` 的背景色const styles = StyleSheet.create ({ v: { backgroundColor:'red' } })然后把
styles.txt作为组件属性style的值<View style ={styles.v}></View>
sytle 样式属性命名法
而且 React Native 中的所有布局和外观都借鉴 CSS2 和 CSS3,它们的最大区别,就是 React Native 采用 驼峰命名法,把所有的 中划线 (-) 去掉然后把中划线后面的首字母大写。
例如要定义背景色,在 CSS 中的语法如下
background-color:red
在 React Native 中的写法如下
backgroundColor:"red"
单位
React Native 所有的外观都是没有单位的。或者说你可以理解它们的默认单位都是 像素。
样式覆盖与优先级
React Native 支持样式的覆盖,覆盖语法其实就是合并多个字典/对象的值,覆盖语法如下
<View style ={[styles.v,{backgroundColor:'#333333'}]}></View>
样式覆盖其实就是把所有的样式对象放到一个数组里 [] ,越是右边,优先级越高,这个和 HTML 中的 class 优先级是一样的。
样式继承
React Native 中是没有样式继承的,每一个组件都要单独设置样式。例如下面的代码
<View style ={[styles.txt,{color:'#333333'}]}
<Text>简单教程</Text>
</View>
运行之后你会发现,文本的颜色没有任何改变,还是它默认的黑色。
所有 style 属性
所有的 style 可以使用的布局和外观的属性,可以参考 View Style Props 和 Text Style Props
范例
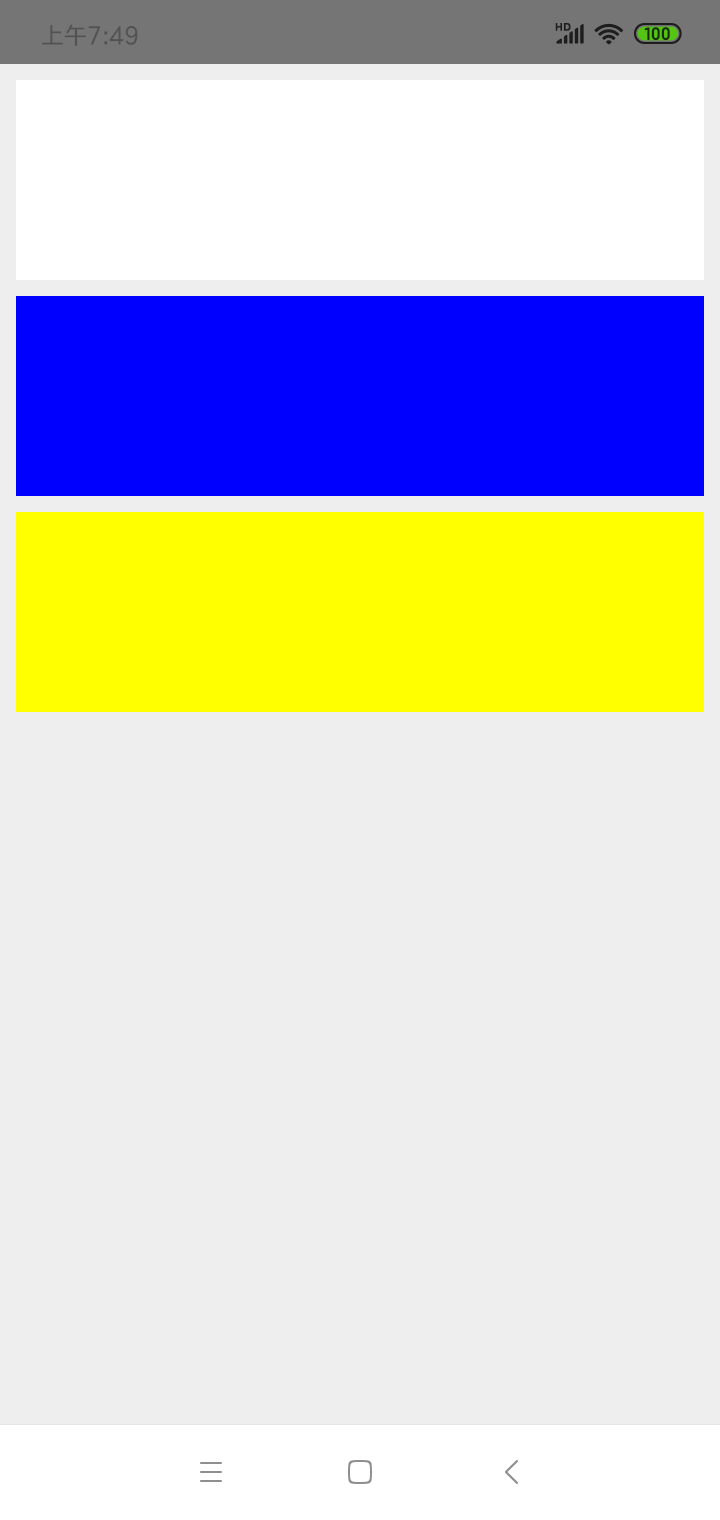
下面的代码,我们通过 StyleSheet 定义一个通用样式,通过视图组件属性 style 定义自己的独有样式
import React, { Component } from 'react'
import {View, StyleSheet } from 'react-native'

export default class App extends React.Component {
   render() {
      return (
         <View style={styles.container}>
            <View style={styles.card}></View>
            <View style={{marginTop:8,marginBottom:8,height:100,backgroundColor:'blue'}}></View>
            <View style={[styles.card, {backgroundColor:'yellow'}]}></View>
         </View>
      );
   }
}

const styles = StyleSheet.create ({
   container: {
      flex:1,
      padding:8,
      backgroundColor:'#eeeeee'
   },

   card: {
      height:100,
      backgroundColor:'#ffffff',
   }
})
运行效果如下

使用Flexbox布局
本文档贡献者:sunnylqm(98.94%), lijason1121(1.06%)我们在 React Native 中使用 flexbox 规则来指定某个组件的子元素的布局。Flexbox 可以在不同屏幕尺寸上提供一致的布局结构。一般来说,使用flexDirection、alignItems和 justifyContent三个样式属性就已经能满足大多数布局需求。译注:这里有一份简易布局图解,可以给你一个大概的印象。React Native 中的 Flexbox 的工作原理和 web 上的 CSS 基本一致,当然也存在少许差异。首先是默认值不同:flexDirection的默认值是column而不是row,而flex也只能指定一个数字值。Flexflex 属性决定元素在主轴上如何填满可用区域。整个区域会根据每个元素设置的flex属性值被分割成多个部分。在下面的例子中,在设置了flex: 1的容器view中,有红色,黄色和绿色三个子view。红色view设置了flex: 1,黄色view设置了flex: 2,绿色view设置了flex: 3。1+2+3 = 6,这意味着红色view占据整个区域的1/6,黄色view占据整个区域的2/6,绿色view占据整个区域的3/6。
FlexBox布局整理
Flex基本概念
在flex容器中默认存在两条轴,水平主轴(main axis)和垂直的交叉轴(cross axis),这是默认的设置,你可以自主改变主轴和交叉轴。
在容器中的每个单元块被称为flex item,每个项目占据的主轴空间为(main size),占据的交叉轴的空间称为(cross size)。

flex容器.png
Flex容器属性
flex-direction || flex-wrap || flex-flow || justify-content || align-items || align-content
flex-direction: 决定主轴的方向
.container {
    flex-direction: row | row-reverse | column | column-reverse;
}
默认值:row,主轴为水平方向,起点在左端。

flex-row.png
row-reverse:主轴为水平方向,起点在右端

flex-row-reverse.png
column:主轴为垂直方向,起点在上沿

flex-column.png
column-reverse: 主轴为垂直方向,起点在下沿
flex-wrap:决定容器内项目是否换行
默认情况下,项目都排在主轴线上,使用flex-wrap可实现项目的换行
.container {
    flex-wrap: nowrap | wrap | wrap-reverse;
}
默认值: nowrap不换行,即当主轴尺寸固定时,当空间不足时,项目尺寸会随之调整而不会挤到下一行

flex-nowrap.png
wrap: 项目主轴总尺寸超出容器时换行,第一行在上方

flex-wrap.png
wrap-reverse:换行,第一行在下方

flex-wrap-reverse.png
- flex-flow: flex-direction 和 flex-wrap的简写形式
.container {
    flex-flow: <flex-direction> || <flex-wrap>;
}
- justify-content: 定义了项目在主轴的对齐方式。
.container {
    justify-content: flex-start | flex-end | center | space-between | space-around;
}
建立在主轴为水平方向时测试,即flex-direction: row
默认值:flex-start 左对齐

flex-start.png
flex-end:右对齐

flex-end.png
center:居中

flex-center.png
space-between:两端对齐,项目之间的间隔相等,即剩余空间等分成间隙

flex-space-between.png
space-around:每个项目两侧的间隔相等,所以项目之间的间隔比项目与边缘的间隔大一倍。

flex-space-around.png
- align-items:定义了项目在交叉轴上的对齐方式
.container {
    align-item: flex-start | flex-end | center | baseline | stretch;
}
建立在主轴为水平方向时测试,即flex-direction: row
默认值为stretch即如果项目未设置高度或者设为auto,将占满整个容器的高度。

align-items-stretch.jpg
假设容器高度设置为100px,而项目都没有设置高度的情况下,则项目的高度也为100px。
flex-start:交叉轴的起点对齐

align-items-flex-start.jpg
假设容器高度设置为100px,而项目分别为20px,40px,60px,80px,100px,则如上图显示。
flex-end:交叉轴的终点对齐

align-items-flex-end.jpg
center:交叉轴的中心对齐

align-items-center.jpg
baseline:项目的第一行文字的基线对齐

align-items-baseline.jpg
以文字的底部为主,仔细看图可以理解。
- align-content:定义了多轴线的对齐方式,如果项目只有一根轴线,那么该属性将不起作用
.container {
    align-content: flex-start | flex-end | center | space-between | space-around
}
这个可以这样理解:
当你flex-wrap设置为nowrap的时候,容器仅存在一根轴线,因为项目不会换行,就不会产生多条轴线。
当你flex-wrap设置为wrap的时候,容器可能会出现多条轴线,这时候你就需要去设置多条轴线之间的对齐方式了。
建立在主轴为水平方向时测试,即flex-direction:row,flex-wrap: wrap
默认值为stretch,看下图的图就很好理解了

align-content-stretch.jpg
从图可以看出又三条轴线(因为容器宽度有限),当值为stretch时会三条轴线平分容器的垂直方向上的空间。
值得注意的是,虽然在每条轴线上项目的默认值也为stretch,但是由于我每个项目我都设置了高度,所以它3并没有撑开整个容器。如果项目不设置高度的话就会变成下面这样:

align-content-stretch1.jpg
这个我在前面也有提到(align-items),这里重点还是理解三条轴线会评分垂直轴上的空间。
flex-start:轴线全部在交叉轴上的起点对齐

align-content-flex-start.jpg
flex-end:轴线全部在交叉轴上的终点对齐

align-content-flex-end.jpg
center:轴线全部在交叉轴上的中间对齐

align-content-center.jpg
space-between: 轴线两端对齐,之间的间隔相等,即剩余空间等分成间隙。

align-content-space-between.jpg
space-around:每个轴线两侧的间隔相等,所以轴线之间的间隔比轴线与边缘的间隔大一倍。

align-content-space-around.jpg
到这里关于容器上的所有属性都讲完了
alignItems
- flex-start
- flex-end
- center
- stretch
alignSelf
- auto
- flex-start
- flex-end
- center
- stretch
borderBottomWidth
- number
borderLeftWidth
- number
borderRightWidth
- number
borderTopWidth
- number
borderWidth
- number
bottom
- number
flex
flex在RN中只能为整数值
flexBasis
- number
flexDirection
- row
- row-reverse
- column
- column-reverse
flexGrow
- number
flexShrink
- number
flexWrap
- wrap
- nowrap
height
- number
justifyContent
- flex-start
- felx-end
- center
- space-between
- space-around
left
- number
margin
- number
marginBottom
- number
marginHorizontal
- number
marginTop
- number
marginVertical
- number
maxHeight
- number
maxWidth
- number
minHeight
- number
minWidth
- number
overflow
- visible
- hidden
- scroll
padding
- number
paddingBottom
- number
paddingHorizontal
- number
paddingLeft
- number
paddingTop
- number
paddingVertical
- number
position
- absolute
- relative
right
- number
top
- number
width
- number
zIndex
- number


评论区